
This help file describes the GP5 (v2) version of program. Screenshots are presented in a compressed (with loss of quality) form.
GENERAL DESCRIPTION OF THE PROGRAM
The program is equipped with multifunctional touch-colored color buttons-indicators (to simplify the program interface by reducing the number of buttons and rules). To increase the contrast of the buttons, the program is implemented in dark background colors. The program is international (not dependent on the language). We use intuitive icons instead of the inscriptions on the buttons.

The first page of the program is the title page. Here you see a link to the license, the version number of the program, the button to exit the program and the button to go to the main program page. When you first start the program , the program is activated on this page. For successful activation, the Internet must be connected.
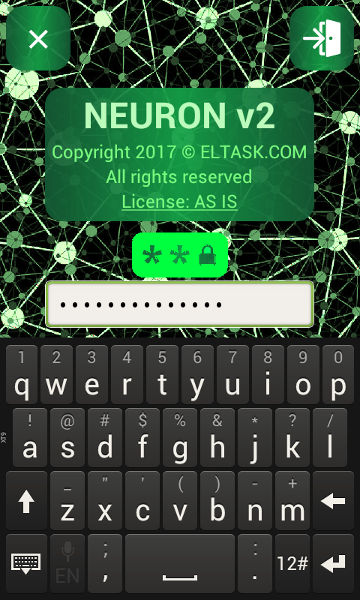
If you fill the "PASSWORD" field in the program settings, the title page will ask for the password.
The next page of the program is the main page of the program.
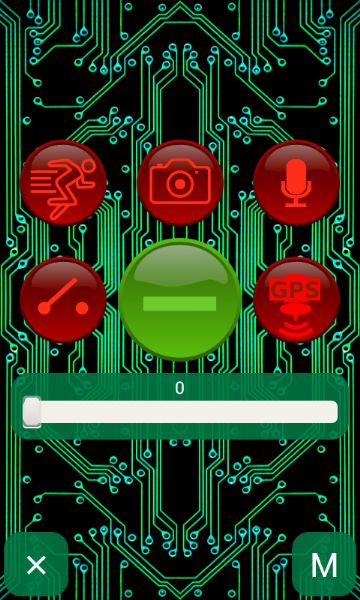
In the center of main page there is a large green button (to enable or to disable of alarm system). This button displays the "-" sign in the disabled alarm state and displays a "+" sign and lights up when the alarm system is on. This button blinks in the transition state (from disabled state to enabled state).
After turning on the alarm system, the program plays "beep" sound. After turning off the alarm system, the program plays "beep beep" sound. You can turn off these signals in the program settings.
Around the green button there are red buttons (and indicators) with icons (buttons sensor, motion sensor, camera sensor, microphone sensor, GPS sensor). These buttons begin to flash after the sensor has been triggered. Pressing any of these red buttons leads to the transition to the sensor setup page.
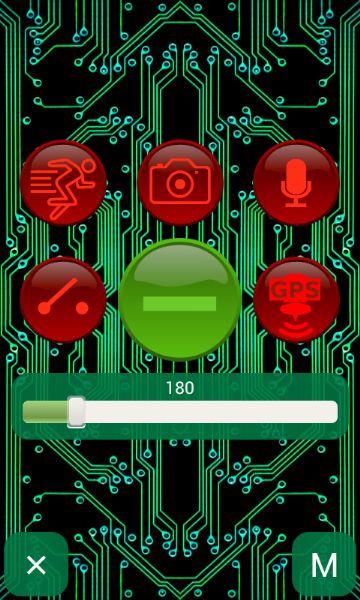
There is a panel with a slider (below the buttons), with which you can set the delay (in seconds) before the alarm system will enabled.
The "X" button (at the bottom) closes the program window (but does not turn off the alarm system if the alarm system was turned on). The alarm system is implemented as an android-service (to improve the reliability of the work). The service also implements the remote control of alarm system (if you have not disabled this option in the program settings). It is desirable that during the work of the alarm system on the screen of your android-device displayed this "main window with big green button" (the screen of the device can be turned off to save energy). But even if somehow the program is closed, the alarm system will not be disabled. The android-service is the alarm system. The android-program is only user interface of alarm system.
In the screenshot below, You can see 180 second delay before enabling of the alarm system. During this time, you can close the doors and leave the home or car (do not provoke the sensors). You can also enable or disable the alarm system from any number of selected phones (this and other possibilities will be described below).
The "M" button (at the bottom of the program page) opens the main menu of the program.
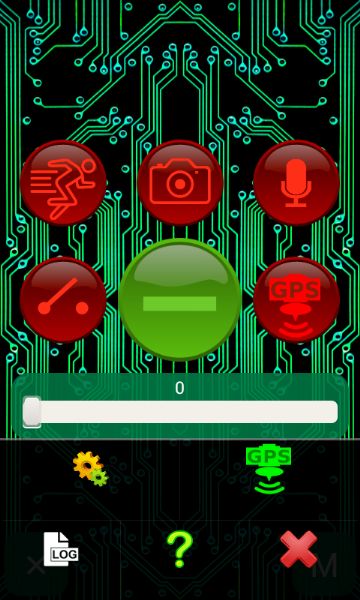
The first (upper left) menu button opens the main program settings page.

The "X" button (in the upper left corner) closes this page and saves all the changed data.
The button with the "SMS" inscription (in the upper right corner of the page) enables or disables the sending of the SMS when the alarm system is enabling or disabling.
The button in the lower right corner of the page prohibits (in the selected state) the playing of beeps when the alarm system is enabling or disabling ("beep" and "beep beep") and the audio signals in the sensors settings windows.
The button in the lower left corner of the page prohibits (in the selected state) the remote control of the alarm system. Remote control is described below (this link).
The blue "+" button and the text field to the right of this button are for entering the phones of the alarm system administrators. You can press blue button and add phone from phone book of your phone or you can enter phones in the text field (using comma between phones). The administrators receive notifications and can remotely control the alarm system.
Below is the text field for entering the password. If you enter a password in this text box, it will be requested on the cover page Resetting the password is done by deleting all the characters in this text field.
Below is the text field for entering the duration (in seconds) of the alarm signal. During this time, the sensors are blocked. During this time, alarm system plays alarm signal cyclically.
Below is a drop-down list of available audio signals of alarm.
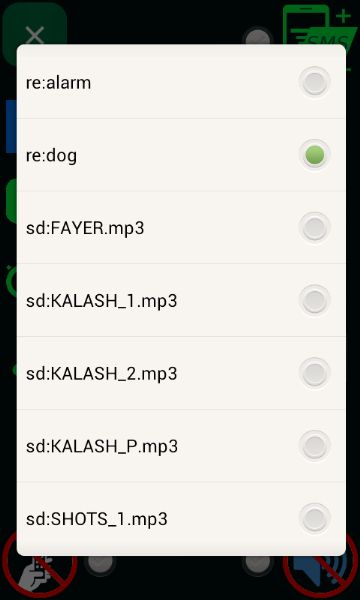
Selecting a new signal will play this signal. The prefix "re:" before the signal name indicates that this resource is built into the program. The prefix "sd:" before the signal name indicates that this resource is stored on the SD card. The program creates the directory "NEURON" on the SD card. You can copy any number of audio files (supported by your phone) in this directory. Unlike hardware alarms (with their already boring audio signals), you can very easily create an audio alarm that you like. By connecting powerful active speakers to your smartphone, you can easily scare the thieves (using sound of barking dog, sound of siren, sound of shooting, any other scary sounds, etc) and draw the attention of police and witnesses.

Pressing the second button with the word "GPS" in the main menu of the program opens the system page of the Android OS. On this page you should to turn on the GPS receiver of your smartphone (or alternative possibilities of determining your geographic location) if you want to use the "GPS-sensor" of this program or want to get the exact geographic coordinates of your smartphone. For example, You can return the stolen car using these coordinates. By clicking on the "<" (back) button of your android device you will close this window and return to the main application window.
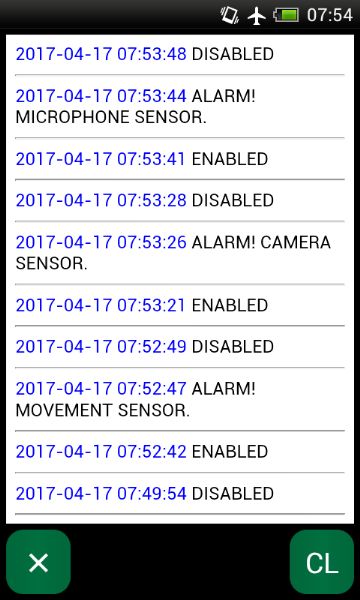
Pressing the third button with the "LOG" inscription in the main menu of the program opens the logging page of the main events of alarm system.
The same events are relayed to the telephones of alarm administrators (if remote control of the program is enabled).
Logging uses a small number of the following simple English words.
ENABLED - the alarm was activated.
DISABLED - the alarm was turned off.
ALARM - the "ALARM" sensor has triggered..
MOVEMENT - the "MOVEMENT" sensor has triggered.
BUTTONS - the "BUTTONS" sensor has triggered.
MICROPHONE - the "MICROPHONE" sensor has triggered.
CAMERA - the "CAMERA" sensor has triggered.
GPS - the "GPS" sensor has triggered.
Pressing the "CL" button clears the log.
ADJUST OFF SENSORS.
The following describes the setup of sensors. Pressing the red button of any sensor in the main working window of the program opens the page of the sensor adjustment. The transition to the adjustment page of any sensor results in automatic shutdown of the alarm (if the alarm system was enabled).
This functionality is unified by us . A little from all the others, only the page for setting the "BUTTONS" sensors differs (this page does not have the functionality of adjusting the sensitivity of the sensor, but displays the monitor of the signals from the buttons).

The green screen on the "BUTTONS" sensor setup page is the monitor for displaying the signals from the buttons. You can see signals from the buttons on this monitor. So you can check if the buttons are properly connected without triggering an alarm.
In the upper left corner, there is a red-green dual button (indicator). This is a very important button! Therefore, we made it so memorable. When the sensor is on, the button is highlighted and a plus ("+") is displayed. When the sensor is off, the button is not highlighted and a minus sign ("-") is displayed.
Below there are three golden buttons (indicators), which include reactions to sensor triggering (play sound, send SMS, call to phones of alarm system administrators).
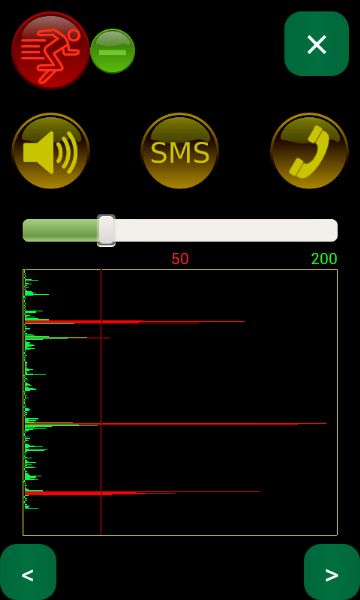
We provide you with a very simple and effective method of adjusting the sensors. We display a time diagram of the "signal level" from the sensor (in the form of columns in the graph moving from top to bottom). The columns in the diagram that trigger the sensor and alarm system are displayed in red. The main purpose of the sensor setup is to set the slider to an acceptable threshold for the sensor to operate.
At the top is a screenshot of the motion sensor setting page. When configuring this sensor, you can simulate the actions of a potential cracker and assign a sensor response limit based on the simulated motion.
If you want to guard the door with this sensor, then put your smartphone into the container (minisafe) and secure the container on the door. Open the door and the signal level diagram will be built. Set the red line closer to the upper border of the diagram (using the slider).
You can also guard the car with this sensor. Secure the container (minisafe) with your smartphone in the car (best in the niche of the driver's door, so that opening the car door also triggered the sensor).

At the top is a screenshot of the microphone sensor setup page. This page works as well as the one described above. The signal level from the sensor here is a conditional "energy" metric from the active (internal or external) microphone. Say some phrase. Set the red line closer to the upper border of the diagram (using the slider). Also, the "CAMERA" sensor and the "GPS" sensor are configured.

At the top is a screenshot of the "GPS" sensor setup page. This page works as well as the one described above. But there are a number of features. This sensor will not work if you do not turn on the GPS receiver (or alternative functionality) of your smartphone. Otherwise at the bottom of the page you will see the "GPS IS OFF" inscription.

This sensor determines the distance in meters from the point of the first measurement after the alarm is turned on until all subsequent measurement points. If the object of protection goes beyond the set radius (boundary), then the alarm is triggered. You can set the border intuitively - simply set the slider to the permissible radius in meters of the signal failure zone. This radius is desirable to choose more errors in GPS measurements (more than 10-30 meters approximately).
This page displays the exact latitude and longitude of your location under the graph (it is essentially a GPS receiver). You can use these coordinates to determine the location using maps or using a large number of different WEB-sites (maps.google.com; maps.yandex.ru; {...}). Alarm administrators can also receive these coordinates by SMS-request (if remote control is not prohibited in the settings).
REMOTE CONTROL OF ALARM SYSTEM
Our program implements remote control using telephone networks (it does not depend on distance). If remote control is not prohibited in the program settings, then you can do the following.
1) You can turn on or turn off the alarm system simply by calling from any of the many phones that you assigned as alarm system administrators.
You do not spend money on this kind of call.
Our program does not answer the call, but only gives a beeping sound ("beep" or "beep beep") and sends an SMS with confirmation (if you enable the option to send an SMS in the settings of the program).
You can add any number of alarm system administrators by simply specifying all the telephone numbers of the alarm administrators in the program settings, separated by commas.
2) You can explicitly enable the alarm system by sending an SMS with the "+" (or "ON", or "ENABLE") command to your android device with our program.
In this case, if the alarm system was turned off, it will turn on. You will receive an SMS with confirmation (if you enable the option to send an SMS in the settings of the program).
3) You can explicitly turn off the alarm system by sending an SMS with the "-" (or "OFF", or "DISABLE") command to your android device with our program.
In this case, if the alarm system was turned on, it will turn off. You will receive an SMS with confirmation (if you enable the option to send an SMS in the settings of the program).
4) You can receive SMS with the status of the alarm system by sending an SMS with the "!" (or "STATUS") command to your android device.
5) Our program will call you back if you send an SMS to the android device with the "CALL" or "PHONE" keyword. This mode you can use to listen to the guard object even when there were no alarms.
6) You can receive SMS with exact geographic coordinates by sending an SMS with the "G" (or "GPS", or "??") command to your android device (with our program).
The accuracy of determining the geographical position of GPS-receivers is "several meters".
You can quickly and accurately detect stolen property (car, motorcycle, smartphone, tablet, bag with things, container).
To use this feature, your android device must be equipped with a GPS receiver and the GPS receiver must be turned on.
7) You can receive SMS with unique identifiers of the nearest mobile phone cell by sending an SMS with the "?" command.
By these identifiers, the police or you (with the help of Internet sites or specialized programs) will be able to determine the location of the property stolen from you (with an accuracy of the order of "hundreds of meters").
This accuracy is less than the accuracy of GPS (see the previous paragraph), but this method is trouble-free wherever there is a telephone connection. The GPS receiver of your android device can be turned off or unable to receive signals from satellites (due to the impenetrable roof) and this will not allow you to use the possibility of the previous item.
In any case, this capability will help you to search for stolen property from you. For example, to find a stolen car in an area with a radius of several hundred meters is a simple task.
SETTING OF THE ALARM SYSTEM
Setting of the alarm system is very simple. You can set the alarm system yourself. We can offer you a large number of different options for implementing effective alarm system using our program. For a long time our engineers tested these options and were convinced of their efficiency and reliability.
ATTENTION. If you use the "MICROPHONE" sensors, it is advisable to transfer your smartphone to silent mode (to exclude false alarms).
Since the smartphone is already equipped with a large capacity battery, even in stand-alone mode, our program on a smartphone can work much longer than hardware alarm systems. For example, in the stand-alone mode (without connecting to the charger) on an inexpensive smartphone (when connecting the "BUTTONS" sensors), our program worked for three days (alternative hardware alarms worked for only a few hours in the stand-alone mode). You can also connect your smartphone to external large-capacity batteries. Such batteries have recently become very cheap. Even if thieves de-energize the security object, they will not be able to disable the alarm system!
If you need to protect your property for a long time (days, weeks, months) continuously, then you simply attach the charger to the android-device and the program will work all time you need. A quality charger from a trustworthy manufacturer will work reliably and will charge your android-device when this becomes necessary. Our engineers also recommend placing your android device and charger in a non-combustible, air-tight container (minisafe). Such protection will be simultaneously fire-fighting and against thieves.
Internal android device sensors required to use the program.
Virtually any smartphone has internal microphone, camera, acceleration sensor, GPS-receiver.
Even if your android device does not have one or more of these sensors, you can work with the program (with other sensors of the program). Moreover, we recommend that you use not more than two or three sensors for protection. The enabling of each new sensor adds power consumption. The "CAMERA" sensor has the biggest energy consumption. The "BUTTONS" sensors have the lowest power consumption.
External devices.
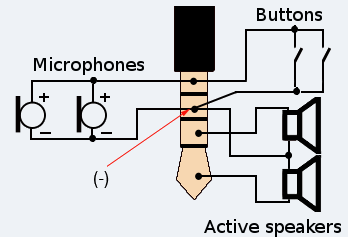
External sensors for our alarm system are:
1) One or more external microphones ( link to examples of microphones );
2) One or more buttons ("BUTTON" sensors; link to examples of buttons). Buttons are connected instead of or in parallel with the microphone.
3) Any other sensors that you can connect via the "BUTTONS" sensor interface (directly; through the relay; through the transistor; the sensor closes the circuit of the "BUTTON" contour and triggers an alarm).
Several microphones and several buttons can be connected in parallel.
All these sensors are connected to the headset socket of the smartphone. After connecting the sensors, the ANDROID OS should display the connection icon of the headset.
In the same slot, you connect active speakers ( link to examples of active speakers ). If you want to connect several external devices at the same time, then you should use splitters and extension cables ( link to examples of splitters and extension cables ) or combine devices in the following very simple scheme.
In case of difficulties, write to us and we will advise you. Publish your questions and suggestions in the comments and we will answer your questions in the shortest possible time.
QUICK START.
Next, we describe typical ways of deploying an effective and reliable alarm system based on our program. We first describe simple elementary uses, moving on to more complex options.
1) First of all (before using alarms), you need to add one or more telephone numbers of alarm administrators in the program settings. These numbers will receive signals about the alarm. With these phones, you can remotely control the alarm. The best reaction of signaling is first of all to warn you about violation of the security mode by an attacker (through the telephone network), and not just "warn" an attacker with a sound signal. If you receive a phone call from our program, then you can take this call and listen to everything that happens on the guard object. If necessary, you can call the police. Thieves, as a rule, escape immediately, as soon as the alarm goes off and thieves feel a real threat of retaliation.
2) It is better to place your android-device (with our program) in the minisafe with a digital or mechanical lock. This minisafe is better to consolidate. So thieves can not disable or destroy your android-device. Even if thieves can steal a minisafe (thinking that there is money in the safe, or together with a car, for example), they will carry our program with them, which will send you (police) precise GPS coordinates and unique identifiers of the cellular telephone Stations (for which the police or you can easily find your property) ...
3) Elementary protection by the motion sensor of a car, a motorcycle, a bag, a suitcase, a container ...
Sensor setup. You adjust the sensitivity of the motion sensor, turn on the necessary response to the motion sensor trigger, turn on the motion sensor, place your android device in the guard object and turn on the alarm (using a time delay or using another phone).
As soon as the movement begins with an intensity exceeding the limit of the adjusted motion sensor, the alarm is triggered in accordance with the selected response reactions (SMS, phone call, audible alarm).
If you are protecting the car, it is better to secure the minisafe in the niche of the driver's door, then the alarm will be triggered when the door is opened. It is enough to protect the car additionally with mechanical and electrical immobilizers and thieves will not be able to steal your car. Silent response to the alarm (only phone signals without an audio signal) will allow you to catch thieves. A loud reaction (with any original sounds - sounds of gunshots, sirens, malicious barking of a dog) will scare away thieves and attract the attention of police and witnesses (and thieves hate it) ...
4) Elementary protection of the sensor "MICROPHONE" apartments, houses, villas, warehouses ...
You can use the internal microphone of your android device or one or more parallel-connected external microphones located in areas of possible noise (near the front door and windows as a rule).
Sensor setup. You adjust the sensitivity of the "MICROPHONE" sensor, turn on the necessary response to the "MICROPHONE" sensor, turn on the "MICROPHONE" sensor, turn on the alarm (using a time delay or with the help of another phone). As soon as the noise level exceeds the restriction of the tuned "MICROPHONE" sensor, the alarm is triggered according to the selected response reactions (SMS, phone call, audible alarm).
5) Elementary protection of the sensor "CAMERA" apartments, houses, villas, warehouses ...
This sensor is desirable to be used in rooms with "constant" ("flat") lighting (to avoid false alarms).
You place your android-device in the minisafe with a hole for the camera, fix minisafe so that the camera was aimed at the zone of the most likely appearance of intruders (for example, next to the entrance doors with an aim to the interior corridor).
Sensor setup. You adjust the sensitivity of the "CAMERA" sensor, turn on the necessary response to the "CAMERA" sensor, turn on the "CAMERA" sensor and turn on the alarm (using a time delay or using another phone). As soon as the signal level from the "CAMERA" sensor exceeds the limitation of the configured "CAMERA" sensor, the alarm will sound according to the selected responses (SMS, phone call, audible alarm).
This sensor has a relatively high power consumption. Therefore, your android device must be connected to the charger or to an external battery when used for a long time in the signaling of this sensor.
6) Protection of the sensors "BUTTON" cars, apartments, houses, villas, warehouses ...
The "BUTTON" sensor closes the circuit and triggers the alarm. Such sensors are usually installed on doors, windows, etc. Often, the "BUTTON" sensors are placed around the perimeter of the guard object.
The "BUTTON" sensors are the simplest, most reliable, most economical and least susceptible to false positives. You can use this sensor for days, even in offline mode. You can even make such sensors yourself. Such sensors are connected in parallel to each other. Use copper wires to connect the sensors to the common circuit. The wires must be protected from external voltages (currents).
Sensor setup. In the program settings, you simply turn on this sensor and select the response to the sensor trigger (SMS, phone call, audible alarm).
7) "Babysitter" mode. Observation of a small child by the "CAMERA" sensor and / or the "MICROPHONE" sensor.
This mode uses the sensors described above. When the child falls asleep, you can install your smartphone in the holder by pointing the camera at the child. If the child cries or starts moving, the smartphone can respond in accordance with the reactions you have set in the settings (call you, send you an SMS, play the child a "lullaby" [recorded by you in the NEURON catalog on the SD card and selected by you in the program settings] ).
8) The mode "Simulation of an evil dog" is a mode of preventive protection of your property, which you can realize only with the help of our program. To implement this mode, you need to do the following. Attach active speakers to your android-device. In the program settings, you select the sound of the maliciously barking dog "re: dog" (or another similar sound signal recorded in the "NEURON" directory on the SD card). Turn on the "MICROPHONE" sensor and turn on the playing of the sound signal for this sensor. For the "MICROPHONE" sensor, set the sensor operation limit. In addition, you turn on the other sensors you need to send a phone alarm signal. After turning on the alarm, our program will "spitefully bark" (like a real dangerous dog) with any suspicious sounds (preceding hacking and penetration), intimidating potential thieves and attracting the attention of witnesses and police (and thieves do not like it) ...
9) Elementary guarding of a car, a motorcycle, a bag, a suitcase, a container by the "GPS" sensor ... Monitoring of children, old people, people with limited legal capacity ...
This sensor gives the object of protection (observation) some freedom - within the limits specified in the "GPS" sensor settings in meters.
Example. In the "GPS" sensor settings, you set a limit of 100 meters (or 1000 meters {...}), turn on the "SMS" or "Phone call" reaction, turn on the "GPS" sensor and signal, give your smartphone to your child {...} . If the child {...} with the smartphone leaves the area indicated by you, our program will signal you about it.
10) Telephone repeater. If you already have an alarm system (in a car, in an apartment, in a garage, in a summer residence {...}), but it does not know how to transmit an alarm to the phone numbers you specify, our program can help you. Specify the telephone numbers of the alarm administrators in the program settings. Connect your alarm to the sensor "BUTTON" of your android-device through the relay. The relay can be connected to the siren loop of your hardware alarm. Even easier (if you do not want to bother with the relay and the connection) is use the "MICROPHONE" sensor (set this sensor to a sufficiently loud level of the SIREN signal to avoid false alarms from background noise). Set up the response for the selected sensor (call or send SMS). As soon as the alarm is triggered, the signal will be relayed to the phones you have selected.
11) Combination of any of the above described elementary cases. First, you assess the risks and assess the features of the object of protection. Then you decide on the number of sensors you need to guard. Then you install, configure, test the sensors and alarm. After successful testing, the alarm is ready for operation.
This help file will be constantly updated. Publish your questions and suggestions in the comments and we will answer your questions in the shortest time and make our program even better.